Thursday, October 25, 2012

Halloween How-To: Building Your Own Costume On The Cheap


I have to admit that Halloween is probably my favorite holiday of the year. Maybe I'm biased because it's also my birthday but I really do think it's an awesome day. I love that everyone dresses up in costumes and celebrates in style!

But what I don't like are store bought Halloween costumes. I'll admit that when I was middle and high school pretty much all of my costumes were store bought. I sinned and I'm sorry. Never again though.

You've probably had the thought "What should I be this year?" and spent time Googling homemade or creative costume ideas. I used to do the same. But now I have a system for picking a great costume using a lot of things I already own. And so can you!

The trick is to pick a character (or whatever the inspiration for your costume is) with key components. Here was my pick for this year:

Violet Incredible has very basic elements to her outfit. Black gloves, black boots, black spandex shorts, red shirt, red tights and a black mask. Easy. These are things I either already had or could find easily at a local mall.

The only things I ended up buying were red leggings, a matching red long sleeved shirt and paper to print a sticker of the Incredibles logo onto. All together, I spend under $25 on the things I needed.
I already owned black boots and gloves and just used a pair of plain black boyshort underwear instead of buying spandex shorts. To make the logo I purchased sticker label paper that was the size of a sheet of paper and simply printed the logo onto the paper and cut it out. I didn't choose iron on transfer paper because I wanted to be able to wear the shirt again this winter.

I also had a black mask from my Hambuglar costume last year. This could be substituted with makeup if you prefer not to wear a mask. All in all I don't think the costume turned out too bad and I could say I made it myself rather than saying I bought it at an overpriced costume store. Plus it was warm so I wasn't one of those girls wearing a skimpy costume to a street festival in 40 degree weather.


Stay crafty, my friends!

Sunday, October 14, 2012

My Heart is in Ohio

UPDATE: So when I started this blog, I had no idea that the string art I made would take off! I am currently selling creations in 8 locations around Ohio and online through my Etsy shop! I even host DIY String Art Parties where you can come and learn how to make your very own piece of string art!

You can find me on Facebook at Trash to Treasure Creations, on Instagram @trash2treasure83, or on Etsy at trash2treasure83.etsy.com

 A few things changed in my technique and the supplies that I use and I would love to share my updates!

1. I use wood that is AT LEAST 1/2 thick. I found that when the wood was 1/4 inch thick, nails were much more likely to fall out.

2. Lowe's or Home Depot will cut wood to whatever size you want. I kept my piece at 24inX24in, which really made a statement. I know not everyone has the space for that size art. Currently, I sell creations in 16inX16in and 12inX12in.

3. I use stain more often than paint. But this is definitely personal preference. You can actually get stain in tons of different colors now which is cool if you want to wood grain to show through.

4. Nail spacing matters. I try to keep my nails 1/4 inch apart or smaller for tight patterns like the example in the blog. I space them out further when I am creating a more sporadic design. I also use size 16X1 1/14 wire nails typically. You can also use paneling nails which come in a variety of colors.

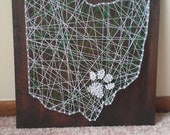
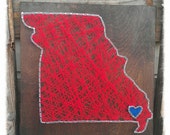
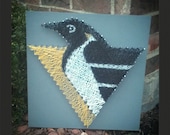
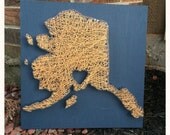
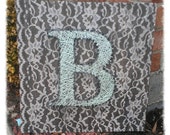
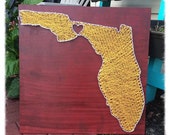
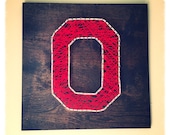
Check out some other work I have done recently:

 Ohio State String Art, Ohio State Football String Art, Any State String Art, OSU FootballThe Original Ohio University Pawprint String Art Ohio State String Art 16X16Custom State String Art Ohio State String Art Any State String Art 12X12Dayton Flyers String Art, State String Art, Ohio State String Art, Custom String ArtMissouri String Art, State String Art, Custom State String Art, State Pride ArtPittsburgh Penguins String Art 16inX16inState string art, Alaska state string art, any state string artInitial String Art Lace String Art Wedding Gift String ArtScript Ohio String Art, Ohio State Buckeyes String ArtState String Art, Florida State String Art, Any State String Art, Custom String ArtString Art Leash/Key Holder. You pick the dog breed and colorsOhio State Block O String Art


And now for the original post:

So I've been crafting like crazy these past few weeks gearing up for holiday craft shows and possible consignment deals. My laptop has been down but I've finally managed to get back to blogging.

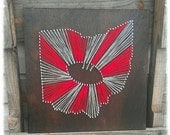
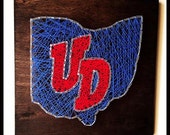
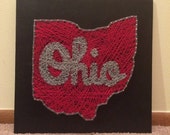
The craft I tried this week has been crazy popular on Pinterest. I saw it and instantly fell in love. Being from Ohio, the "Columbus Love" in this pin really struck a chord so I decided to give it a go. Here's how it turned out:


I didn't follow the tutorial on Pinterest though. Considering I don't own a circular saw or power sander I decided to take a different route. I took a field trip to my local Lowe's where I can't seem to walk up a single aisle without being asked if I need help finding anything. While I usually opt to pick my hardware out myself, I needed a little help in the lumber department this time.

I picked out a board that was about 24inX24in. It was huge. But that's ok. Lowe's offers to cut any wood that you purchase into the size that you want. I made the mistake of picking a board that was a little bit too thin and had a tricky time trying to make sure the nails didn't poke through to the other side. So if you're trying this at home, make sure you pick out a thicker piece of wood.

Next, I picked out a paint color to paint the background. I chose grey since it would make the white string pop and since it went along with the Ohio State theme I was trying to stick to, being the alumni that I am.

I then painted the board using a roller:


While the paint dried, I created a stencil on my computer. I found an image of Ohio and blew it up just using a standard paint program. (Note: Paint sucks, you should try Photoshop or Fireworks if you want it to work better. The netbook I'm currently using just isn't equipped with either.)

I cut out the pieces, taped them into a big stencil, then used painter's tape to tape it to the board. Then, I hammered wire nails into the board around the perimeter of the stencil and then removed the paper from the board:


I chose to stick with the heart design for the middle. I traced a heart onto the board then painted it red. Once it was dry, I hammered nails along the perimeter of the heart as well.

Now it is time to start stringing! I tied off a piece of string to one nail then began looping it around the nails that made the heart. To figure out how many times I should loop the string around the heart nails, I simply divided the number of nails I used for the outline of Ohio by the number of nails I used for the outline of the heart.


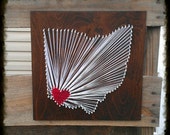
Afterwards, it looked like this:
I added a buckeye leaf in the corner of mine just to stick with my Ohio State theme. All in all it was a pretty quick and painless piece!

Stay crafty, my friends!

Friday, September 14, 2012

No Sew T-Shirt Scarves (As seen on Pinterest!)

As much as I love Pinterest, sometimes I feel like the crafts that look so easy don't always turn out as cute as they look in the pictures. When I saw this scarf pinned to one of the boards I follow, I thought it was too cute to be true. I had to try it.

This was one craft that actually turned out the way it looked in the pictures and I was super excited! I hate spending money on pricey accessories so I was pumped to spend exactly $0 on this scarf!

Here's how it works:

I took a super old t-shirt that was just sitting in one of my drawers. It was an size XL that I used to sleep in so I wasn't sad to see it go. I cut it just below the sleeves.

Once I cut it, it looked something like this:


You're almost done!! Next, I cut fringe into the bottom of the shirt.


Then I pulled the fringe to stretch it out and added a few knots here and there to add character.


 And that's it! It only took me about 10 minutes to do! Cute right? :)


And now I have to tell you about another cute scarf made from a t-shirt. I found this pin here. I'll be honest, for a no sew craft this one really did look too good to be true so I didn't bother taking pictures of the process because I honestly didn't expect it to work. Well much to my surprise it actually turned out quite well! The only thing I wish I would have done differently is cut my spirals a little bit thicker. But it isn't bad for something I didn't expect to work!


Stay crafty, my friends

Wednesday, September 12, 2012

No-Sew-No-Stuffing Dog Bed

Those who know me well know that my dog is my "child" who I like to spoil whenever possible. He is very particular about what he sleeps on. Bare floor? No way. He prides himself on always finding a comfy place to sleep (my bed, throw pillows on my couch, my comforter, my bathmat, my padded kitchen chairs, and of course my pillow).

I mentioned earlier that I am big into upcycling. But sometimes it isn't always obvious how to reuse certain products. For example, I recently bought new pillows for my bed and was planning on getting rid of my old ones. I felt bad just throwing them in the dumpster but what else was there to do with them?

I have to thank my dog, Teejay, for the inspiration for today's project. I set my pillows next to my trash can in my kitchen with the intent of taking them out to the dumpster when I took my trash out later that day. However, Teejay had other plans. This is how I found him:


It got me thinking that this pillow would make the perfect template for a new doggie bed for Teejay. This is a take on the no-sew blankets that are ever so popular. But instead of making a blanket, I made a pillow cover.

WARNING: Teejay shows up a lot in this tutorial. He was so excited about new, comfy material that he just wouldn't leave me alone while I was making the bed. Eventually, I got tired to trying to shoo him away.

The first step is to pick out your fabric. Your best bet is fleece. It works well for the no-sew part. As you can tell from the name of this blog, I really only do crafts that don't involve any sewing. I really can't sew and it really annoys me when cute crafts are ruined by my inability to sew correctly. Anyway, I picked out two different patterns that were 60% off at Jo-Ann's and ended up paying under $10 for the fabric.


Teejay was so excited about the new fabric that he couldn't leave them alone long enough for me to get a good picture. I purchased a yard of each fabric but that ended up being way too much! I trimmed the fabric down so that is was a little bit larger than the pillow. I made sure to leave enough fabric around the edges to make the strips to tie the pillow together. Teejay, of course, had to be the center of attention.


 With the fabric cut to size, I laid the pieces of fleece on top of each other. I cut squares of fabric from each corner. Then cut about 3 inch strips down each side. They don't need to be exact or perfectly cut, trust me. That's the beauty of no-sew.

When I finished cutting it looked something like this:

Next, I began double-knotting the top and bottom layers of fleece together. TIP: Don't tug on the fleece too hard or it will stretch out. Be gentle!

Before tying the final side, I put the pillow inside. Teejay had to get off the fleece for this part. But he stayed close by in my lap.

After I finished tying the final side, the project was complete! It took under a half an hour to do. The best part about this pillow is that there is no stuffing immediately available for Teejay to chew on or pull out and make a mess!

The final product (and a very happy puppy):


 Stay crafty, my friends.


Tuesday, September 11, 2012

Brass is Out

I have to set today's craft up with a back story and apologize because this is going to be a long entry. Since I moved into my apartment last year, I have been searching for a lamp to put on a small book shelf next to my door. I have never found one that matched the color scheme of my room.

Specifically, I wanted it to match the framed poster I have hanging next to the book shelf.


You know what they say, if you want something done right you have to do it yourself. So today I have decided to create my own lamp instead of endlessly searching for one.

Now for the craft.

I absolutely love thrifting. Thrift stores are one of the best places to find cheap crafting materials. That being said, most of the things you find in thrift stores aren't exactly "display ready" upon purchase. But with a little creativity and free time these thrifty finds can become one-of-a-kind masterpieces. I ended up spending less than $15 on the lamp I made today, which isn't too shabby if I must say.

Today, at my local Salvation Army, I found this gem for $4.


It was ugly and brass (vomit) and had a terrible lamp shade that was stained with God knows what. It needed me to fix it up. I also purchased a new, less tacky, customizable shade from Jo-Ann's (for about $10 on sale) and a can of spray paint to do the base.


Just for giggles I took a journey down the paint aisle of Lowe's after picking out spray paint to see if they would have any colors that came close to matching my poster. Without the poster with me, I was doing this entirely by memory. I purchased a small container (for about $3) of a color I thought was sort of close. Somehow, I struck gold.

I brought all of my treasures home and began my craft. I removed the original shade from the lamp and disposed of it. Since the lamp was in such rough shape, I gave it a nice sponge bath with warm, soapy water. I dried it off and took it outside to begin spray painting. I covered the parts I didn't want painted in painter's tape (like the cord) and began painting. I did about three coats of paint to make sure I got every crease. It already looked a million times better.


Next, came the shade. The one I bought came with an outer layer that you could customize and then stick back on to the shade. I painted about 4 coats of the Valspar paint onto the shade cover. I made sure to always paint in the same direction and that the coverage was even. That way, when the lamp was turned on, the coverage didn't look spotty on the shade.

After painting the first coat, I thought I was going to hate the color and had a small anxiety attack that I had just committed a major craft fail. But after a few more coats, it actually looked really nice.


Next came the trim. I had some lace left over from a previous craft so I decided to add that to the shade to give the lamp some character. I cut a piece about a half inch longer than the shade cover (to allow for possible mistakes).


When it comes to gluing anything, I swear by Mod Podge. I credit it with all of my greatest crafting successes. I applied a liberal layer to the shade and worked on smoothing the lace down onto the surface. Don't be afraid to get your hands a little messy during this step. The lace can be a little tricky to get to lay flat since the shade is curved so you really have to work with it. I ended up cutting a few slits in the lace so that I could lay it evenly without creating lumps or creases.

I covered the lace with another layer of Mod Podge after I had it positioned where I wanted it. I let it dry for about an hour.


Next, I reapplied the shade cover to the shade. This was honestly the most frustrating part. I felt like I needed a glass of wine after peeling and place and then repeeling and replacing the shade cover until it was perfect. But once I got it in place, I was really pleased with the result. I used another layer of Mod Podge to seal the ends together.


I let that dry for another hour or so and finally put the lamp together. Voila! The end result!


Stay crafty, my friends.